
North Fremantle (3)
WAGR - Eastern Railway (E. R.) | |
Mileage ? | |
Next Down Station: | Next Up Station: |
Quick Facts | |
Opened | Closed |
1963 | 29/10/1990 |
Mechanical | Electrical |
60 Levers | Illuminated Track Diagram |
Initially saved for re-use, then scrapped | |
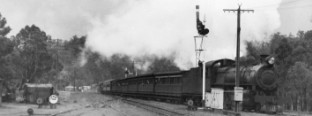
The North Fremantle signal cabin pictured here was situated on the suburban section of the 'Eastern Railway' between the North Fremantle and Leighton stations (stopping places only) but worked with Fremantle Box 'B' in the 'Up' direction and Cottesloe signal cabin the 'Down' direction. In the rare event that the Cottesloe Signalman 'cut-out' before the North Fremantle Signalman, then 'North' would end up working directly with Perth Box 'B' but in theory, either Claremont or Subiaco could also have been worked with in the 'Down' direction.
Records currently at hand indicate that there may have been up to three previous signal cabins (at least) in the vicinity which carried the name "North Fremantle", including a pair of boxes called North Fremantle Box 'A' and North Fremantle Box 'B'. The cabin seen here however, became the last at this location, and housed a 60 lever McKenzie and Holland No. 9 Pattern frame typical of most W.A.G.R. cabins. It was quickly built to replace an emergency 10 lever box necessitated by the previous cabin being destroyed by fire earlier in 1963.
The building attached to the cabin (on the right hand side in the photo) was the relay room. This was accessed via a door from one of the landings in the semi-enclosed stairwell between the two buildings.
North Fremantle signal cabin was one of the W.A.G.R.'s 'new-look' lever cabins, designed during the 1950s to simplify cabin construction. Should circumstances require, these cabins could be dismantled and moved between locations so the building could be called a 'transportable' design.
Similar cabins to this design could be found at the 'new' Perth 'A' Cabin; Narrogin, and Koojedda. This last cabin proved the point of the design by being moved to Kwinana in 1967 and it remains there to this day, as the last lever cabin working on the Westrail system. It has in fact, been at Kwinana far longer than it ever was at Koojedda! These cabins were constructed on timber framing (usually on steel support bases) with the exterior clad in fibro sheets. The interior was finished in vertical match-boarding to the waist rail and plasterboard up the remaining wall height and ceiling. North Fremantle and Narrogin cabins seemed to share the same window design - three smaller panes per window 'bay', whereas Kwinana and the 'new' Perth 'A' Cabin were provided with only two (larger) windows per bay, which made window cleaning a bit awkward!
The Signalman in this North Fremantle signal cabin controlled the Up and Down narrow gauge suburban lines, and the junction for the narrow and standard gauge freight lines into the Leighton marshalling yards. In addition to these shunting yards, there were oil company sidings, roads leading to the Port of Fremantle's north wharf and C. B. H. grain silos, a wagon examiners siding and diesel locomotive depot. Perhaps just noticeable behind the cabin in the photo above, was a run-around siding used for shunting the nearby "Great Southern Roller Flour Mill" which later became the "Dingo Flour Mill". This run-around was accessed via the cabin's only set of manual points - No. 45. This rail crossing spanned both suburban mains. At the Leighton end, a shunt signal and a catch point protected the main from trains shunting out from Leighton. Then, two diamond crossings (one each on the Down and Up Main line had to be traversed, and finally the points onto the line leading to the run-around itself. The two diamond crossings were interesting in their own right due to the fact that a third rail was provided on the south side, making it appear as though preparations had been made to provide for standard gauge access to the transfer sidings and therefore the flour mill or Rocky Bay line. The 'B' end of No. 45 points (the catch point) were quite some distance from the cabin, and therefore made the crossover very hard to pull! Hand operated points located near the Flour mill, and close to the Stirling Highway, lead to the "Rocky Bay line" which ran along the strip of land between the Indian Ocean and the Swan River. This line serviced the State Engineering Works, a pyrites siding and the Colonial Sugar Refinery on the banks of the Swan River.
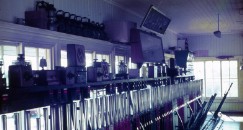
The interior of North Fremantle Cabin was quite spacious. The back wall of the cabin was adorned by no less than two Train Register desks (one each for narrow and standard gauge Train Register Books), five telephones and the ever-present Signalman's Hecla kettle and Metters electric cook top. It was perhaps prudent for the W.A.G.R. to provide these electric heating appliances, because there had been a spate of cabins destroyed by fire over the years (see Subiaco), and the former North Fremantle cabin had been no exception - although in this case it was thought to be a lightning strike hitting the overhead wires to the Sykes Lock and Block instruments.
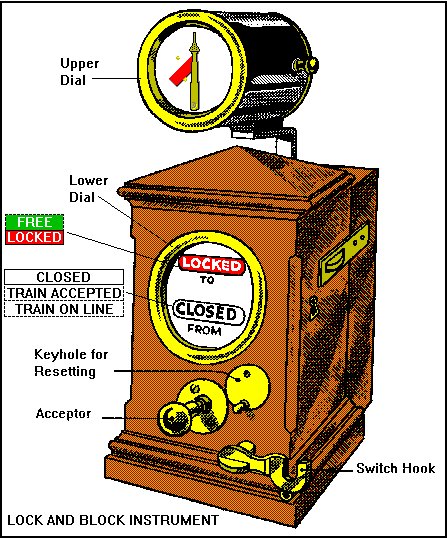
Even though the cabin looked 'modern' for it's time, Sykes Lock and Block instruments were still used in this cabin to control movements along the main lines until 1964, when they were finally replaced by colour-light signalling. As can be seen in this picture, the policy of painting lever handles silver as seen at Claremont and Cottesloe, was also in force here. Yellow lever No. 42 in this frame (unlike those in the Claremont and Subiaco cabins) released a Switchlock which controlled a set of points on the standard gauge departure road. These permitted train movements from the standard gauge yard. Towards the latter years of the cabin's life this facility was seldom used, and in none of the diagrams of signalling for 'North' currently held by SignallingWA does the switchlock rate a mention in the 'Description of Levers' - even though it is clearly drawn and labelled on a number of diagrams. Curious!
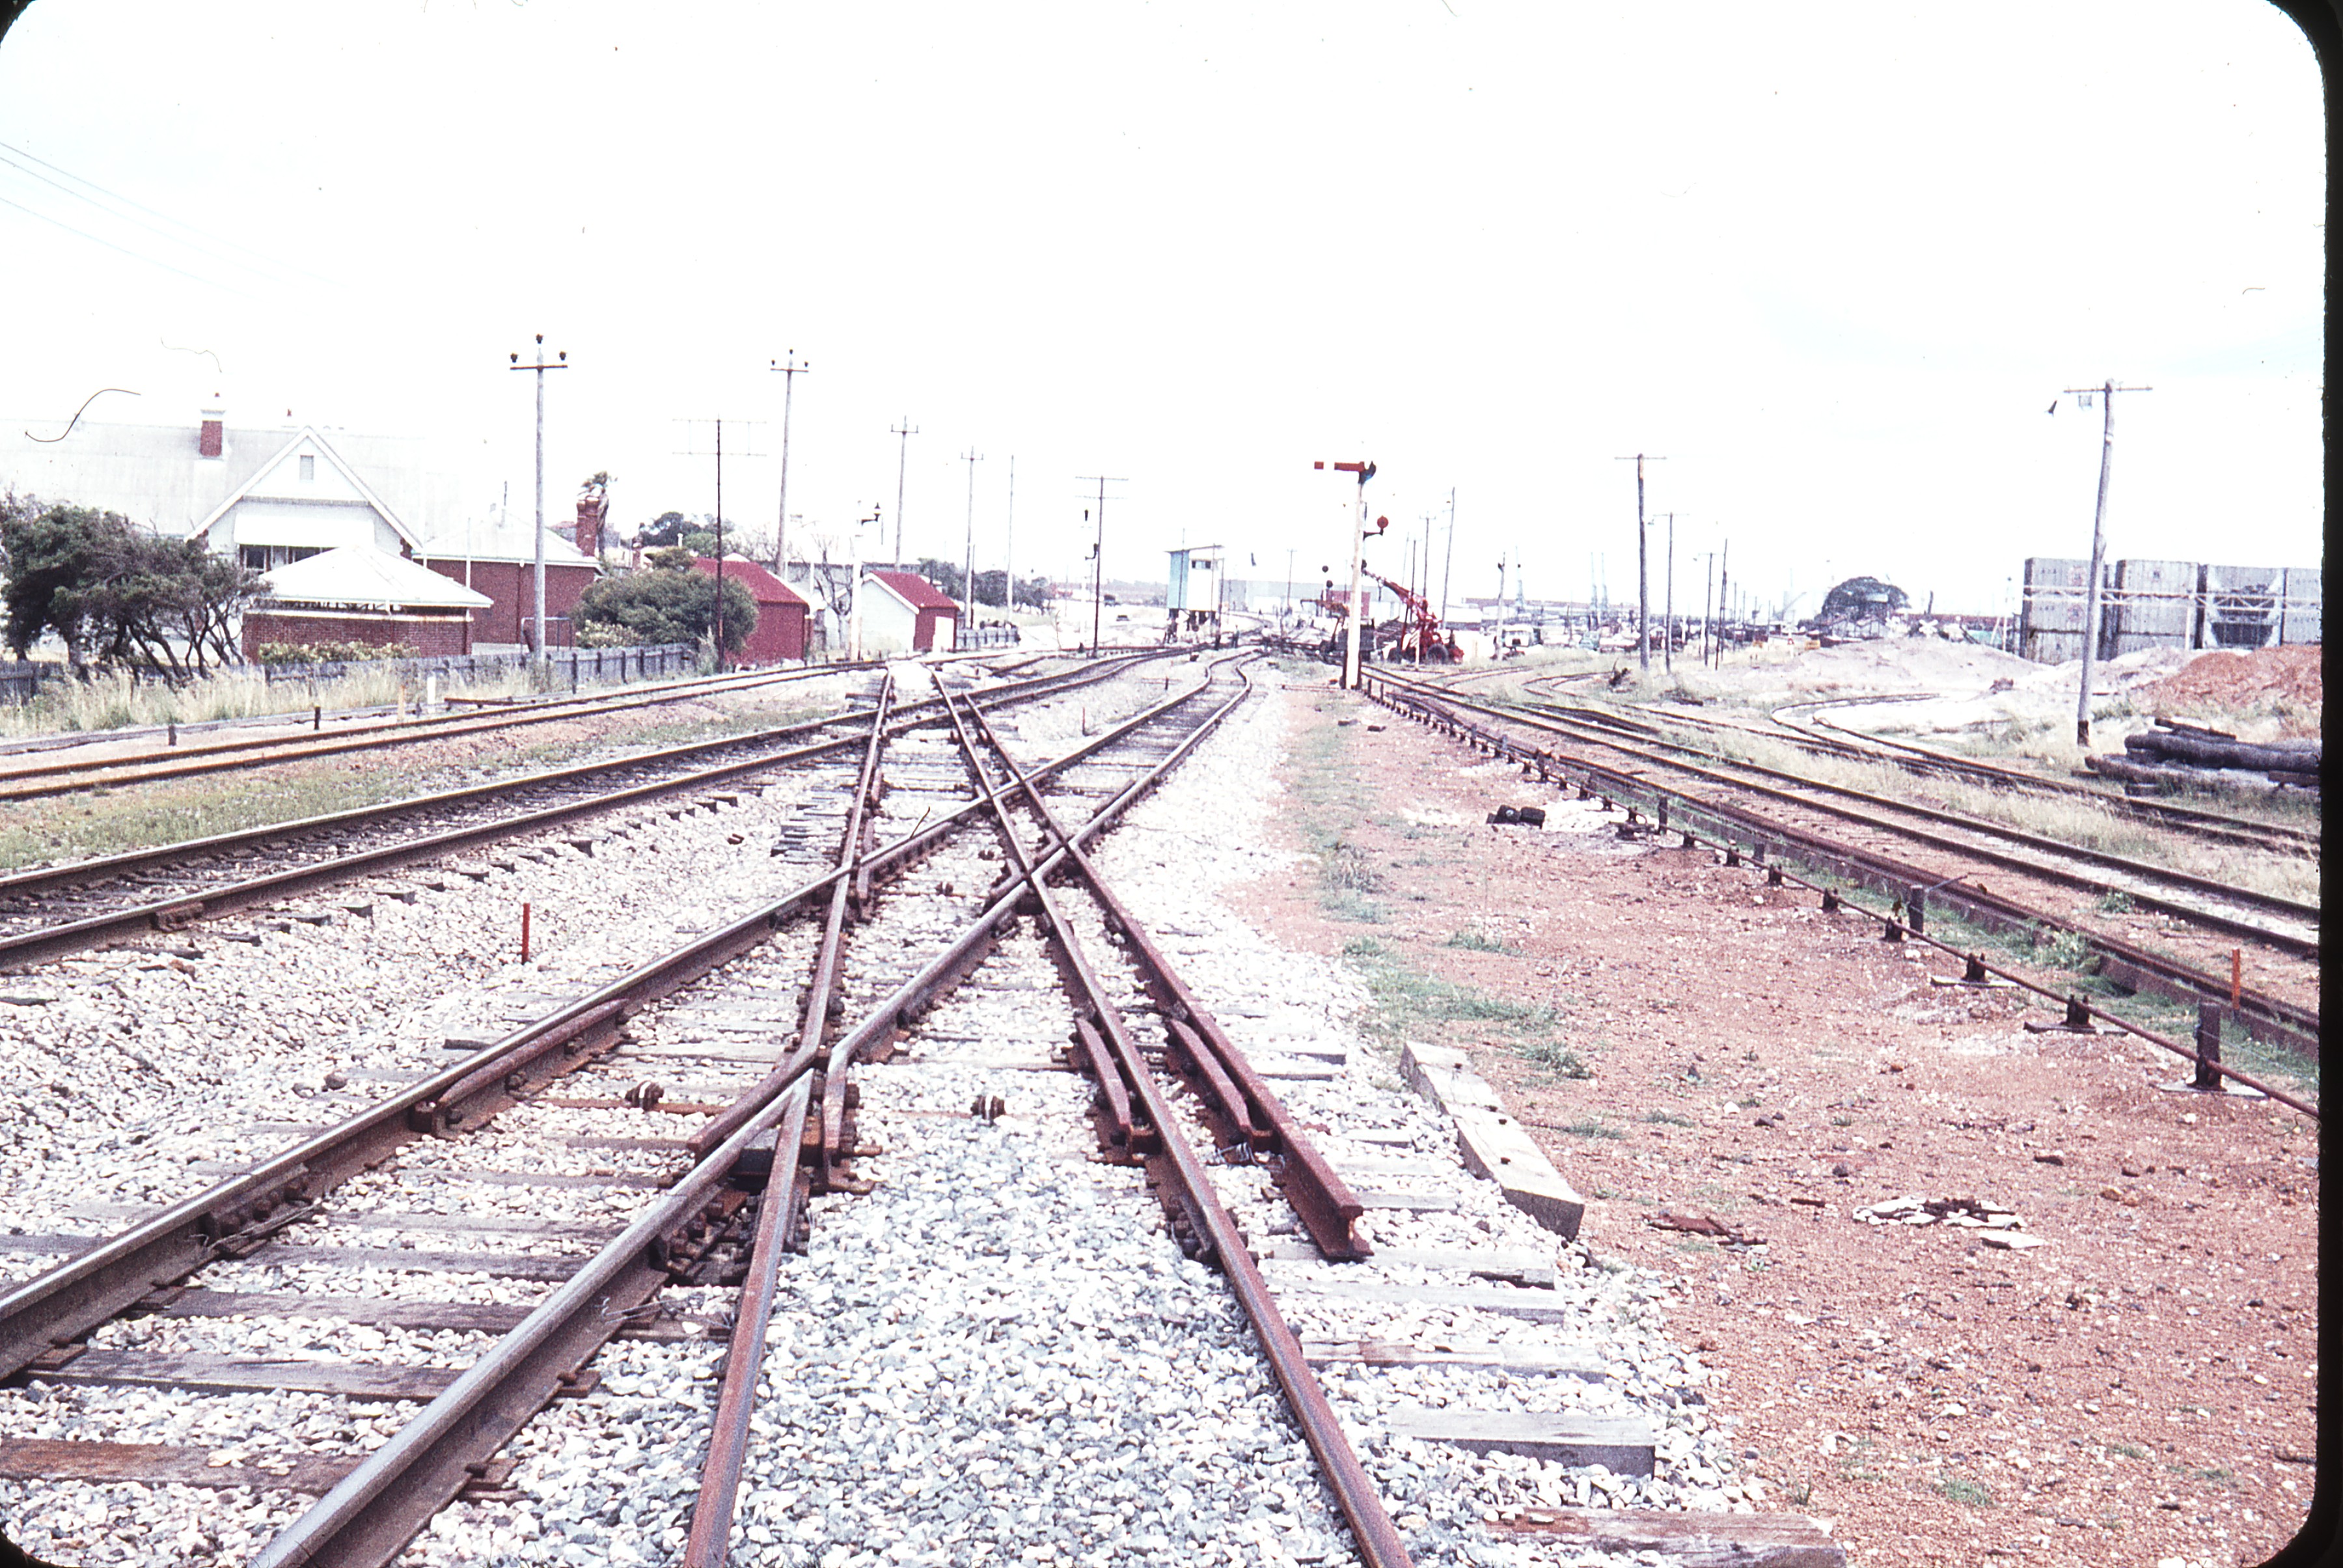
Unlike the view from the Robb Jetty Panel, the view from North Fremantle was anything but inspiring. The photo seen above shows the industrial landscape which existed between the cabin and the Indian Ocean, even though it was only a few hundred yards away. The shunting signals seen mounted on the post on the right side of this view were unusual in as much as they were fitted with additional indicator lights. These lights were little more than converted marker, or 'A' lights, as seen on semi-automatic signals which could work automatically when cabins were 'switched out'. At North Fremantle, these lights were provided with 'N' and 'S' letter stencils. The 'N' light applying to shunt signals 19 and 10 on the left hand side of the post, for moves to the narrow gauge Goods Road and yard respectively, and signal 8 on the right hand side of the post, for moves to the standard gauge Arrival Road. The idea of these lights were to provide loco drivers approaching the signal on the dual gauge track with additional information at night or in difficult sighting conditions, of the gauge of line that the cleared shunt signal was set onto. Even with this safety feature, quite a few locos continued to be derailed just past this signal!
The unballasted line in the foreground of the photo appeared to have once connected with the incoming standard gauge Arrival Road on the north side of the Down crossover (No. 22 points). No documentary evidence in support of this is currently to hand though, only a sketch by a 'learning Signalman'. If it did indeed join at that location it was probably worked by No. 23 lever, and No. 22 points would have had to have been dual gauge. The line was probably found to be 'redundant' due to the better positioning of No. 24 narrow gauge crossover which was used for all movements to and from the Goods Road and yard, to the main lines. It was also interesting to note that both Up narrow and standard gauge trains leaving Leighton ran along the Down main for a distance of about 300 yards.
At Leighton, a very modern tower was built during the 1960s construction of the standard gauge line. The intention being to house, along with the Yardmaster's office, offices and staff amenities, a panel box to control the marshalling yard, and, rumours had it, the line between Fremantle and Cottesloe. This never eventuated, and the panel side of the tower was left barren, and the relay room on the floor directly below it, empty.
In order to despatch and receive trains in an orderly fashion to and from North Fremantle cabin, a set of four semaphore signals were provided at the Leighton end of the standard gauge Arrival / Departure Roads and the narrow gauge Goods Road. These were worked from a small ground frame near the Leighton tower and were operated by the shunting staff. They were electrically 'slotted' (released) by North Fremantle levers 17 (standard gauge) and 16 (narrow gauge).
The North Fremantle cabin, in it's last years of life, was attended by two Signalmen working shifts of 06:00 to 14:00 and 14:00 to 22:00 (or until the last train of the night from Leighton had reached Fremantle Box 'B'). An occasional Saturday working to cover the despatch of repaired Bauxite an other wagons to Kwinana was also available. Unlike Cottesloe, there was no 'overlap' between shifts.
This cabin was made redundant on the 29th October 1990 due to the electrification of the Perth to Fremantle suburban passenger service. The cabin was carefully dismantled and stored at the Signal Workshops at Forrestfield in case the need arose for an emergency signal cabin. The leverframe was meticulously dismantled, numbered, and stored. However all this came to nought however when the scrap dealer came visiting!
Information researched and interpreted by Chris. J. E. French of SignallingWA
Thanks to Robert Pearce for additional information used in the compilation of this page.
Any additional information on this signal cabin would be most welcome - please use the e-mail form provided on this page.
Photographs © by Chris. J. E. French and Paul Hrebtiewsky
Diagram of Signalling and Photograph © by W. A. G. R.
Buy this page or View your SignallingWA Shopping Cart
This page is copyright, and permission must be sought from SignallingWA before this page is used for any purpose other than personal education.
NORTH FREMANTLE (3) Employees | ||
This list may not be complete and does not yet include employees who worked here without being appointed. Where an appointment date is unknown, the Weekly Notice (WN) date advising of the appointment or other official documentation, i.e. Certificate of Competency (CC) will be used. | ||
Name | Appointed | Position |
| Warne, Rex Lindsay | 01/04/1976 - Permit to Learn | |
| French, C. J. E. (Chris.) | 10/05/1979 (CC) | Signalman, Class 2 |
| Bentley-Taylor, Gary | 11/06/1982 | Signalman |
| Bailey, Phillip W. | 07/06/1983 - CC | Signalman, Class 2 |
| Brennan, G. (Greg) | 03/02/1988 - Permit to Learn | |
| Burke, S. F. | 08/02/1989 (CC) | Signalman, Class 2 |
| Taggart, B. | 31/03/1988 - Permit to Learn | |
Is a name missing? Please submit any corrections / additions with suitable evidence using the e-mail form above. | ||