
Staff and Ticket
STAFF AND TICKET

STAFF AND TICKET SYSTEM ON THE EASTERN RAILWAY.
-----t-----
The staff and ticket system, which has just been introduced into the train service on the Eastern Railway, is similar to the system universally adopted on single lines.
According to the "train staff regulations" issued by Mr. Clayton Mason, the line is divided into sections. For instance, the line between Fremantle and Perth is divided into two sections - Fremantle and Claremont and Claremont and Perth.
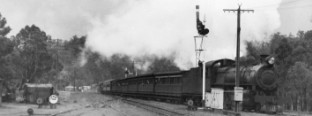
A staff coloured red will be used on the Fremantle - Claremont section, and a blue one on the Claremont - Perth section. No train can travel on either of these sections without the staff proper to the section, or its equivalent, a ticket. A train on leaving Fremantle will receive the red staff and leave it at Claremont, taking up at that place the blue staff. By this arrangement it is impossible for two trains to be travelling in opposite directions on any section of the line, and thus there is no possibility of collision, unless, indeed, any driver should be mad enough to start without a staff. The tickets, which are kept in boxes of which the only key is the staff of each section, will be used in cases where two or more trains have to follow each other. Supposing that two trains have to start within ten minutes of each other from Fremantle for Perth, the first will travel on a ticket taken by means of the staff from a special box, and the second will start on the authority of the staff itself. We may add that another precaution against accident adopted by the Railway authorities is the placing of a danger signal against all trains approaching Perth station from the direction of Guildford. No train can enter the station until the signal is lowered as an intimation that the platform lines are clear.
Page 13, The Western Mail, September 11, 1886
WHY WAS IT USED?
When only a single line of track existed between stations, some form of regulating the movement of trains was necessary in order to eliminate the risk of trains colliding (meeting 'head-on' for trains going in different directions) on such lines. To a lesser degree, the possibility of collisions between trains travelling in the same direction was also reduced.
WHAT SORT OF EQUIPMENT WAS USED?
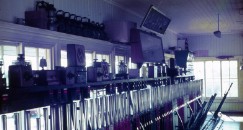
The Train Staff and Ticket system of working used the most basic of equipment, yet afforded effective safety - so long as everyone worked by the rules! Under this system of working, there was only ONE Staff for the Section, and when not being used to move trains over the section, it could be found at one of the Staff Stations to which it applied. At each of the 'Staff Stations' (at either end of a "Staff Section") a Staff Box was provided. Inside this Staff Box a book of Staff Tickets were kept. The normal condition of this Staff Box was closed and locked. The 'key' for the Staff Boxes at each end of the same Staff Section was the Staff for the same Section. Being a 'key', the Staff for one Staff Section would not fit into a Staff Box of the next, or previous, Staff Section. As an additional visual safety measure, the Staff for a Section; the Staff Boxes; and the Tickets for the same Section were all coloured the same. Full details of the various colours used for Staff and Ticket working will be given further down this page. Examples of the equipment used to work trains over a single line Section Red and Blue Sections in this case, are shown below.


WHAT WAS THE CONCEPT?
The concept is called "Absolute Block." A key element of Absolute Block requires that under normal operating circumstances only one train is permitted to occupy a Staff Section at one time. Basically, the Absolute Block method involves the division of the single lines of railway into 'sections', typically, this would mean the railway line between two adjacent Staff stations, i.e. COOL to CALM.
For many years the W. A. G. R. used a model railway layout in their Training School to instruct their employees, and put the theory they learned into practice. The names of three of the stations on this layout reflected the requirement of all Signalmen, and others involved in the safe working of trains, to have a "...cool, calm and collected demeanour." For the purpose of instruction, this page will continue this naming convention.

HOW IT WORKED
One train, in one direction: COOL to CALM.
Under normal operating circumstances, (and with the Red Staff for the COOL to CALM section being at COOL), for a train that requires to travel between COOL to CALM, the Signalman at COOL would ask "Is Line Clear..?" of the Signalman at CALM by means of the railway telephone.
Provided that the Signalman at CALM is in a position to permit the requested train movement, the Signalmen consult their timetable, and, provided that there are no further trains to follow the train currently waiting at COOL station, the Signalman at COOL hands the Staff to the Driver of the train.
Once in possession of the Staff, this authorises the Driver of the train to occupy the COOL to CALM (RED section), but he cannot leave COOL until he receives permission from the Signalman at COOL. When this has been obtained, the Driver carries the Staff on the locomotive to CALM.
Upon arrival at CALM, he must deliver it to the Signalman there and he will, unless it be needed for another train movement, place the Staff on top of the Red Staff Box there.
The Driver must then await possession of the Staff (or Ticket) for the CALM to COLLECTED (BLUE section). The same procedure would then take place at CALM for the train to proceed to COLLECTED.
Two, or more trains in the same direction: COOL to CALM.
The following example is give below if there had been other (following) trains to run between COOL and CALM - before a train was to run in the opposite direction between CALM and COOL:
The Signalman at COOL would issue all but the last of these trains to leave COOL with a Ticket (after first showing the Driver the Staff to confirm that the Signalman at COOL did indeed possess the authority for the COOL to CALM section).
The Driver of each train issued with a Ticket would then carry the Ticket to CALM as their authority to occupy the section.
Upon arrival at CALM, each Driver must hand the Ticket to the Signalman at CALM.
The Signalman at CALM would then write the word "Cancelled" across the face of the ticket (so that could not be re-used) and send it to the District Traffic Superintendent at the end of each month for checking.
The Driver of the last 'following train' would be handed the Staff, and would carry this as his authority to occupy the COOL to CALM section.
Upon arrival at CALM, he must deliver it to the Signalman there and he will, unless it be needed for another train movement, place the Staff on top of the Red Staff Box there.
In unusual operating circumstances / emergencies:
In the event that "Line Clear" could not be obtained from the 'station in Advance' (in this example CALM) the Signalman would await the expiry of 'normal section running time' (the time it would normally take for a train to run between COOL to CALM) for the first train, and would provide the Driver of the following train with a Caution Order in addition to the Staff for the section. Upon arrival of the following train at CALM the Caution Order is treated in the same way as for Staff Tickets.
Failure of the Train Staff and Ticket System:
If this system of working failed, paper-based Proceed Orders or Pilotworking, where a person can be used in place of the Section Staff, could be used.
1892 - Train Staff and Ticket Sections and the Staff Shape and Colours in use |
||
Staff and Ticket Section |
Staff Shape |
Colour |
Fremantle and North Fremantle |
Round |
Pea Green |
North Fremantle and Claremont |
Round |
Cerise |
Claremont and Perth |
Round |
Dark Blue |
Perth and Bayswater Loop (Used when required) |
Round |
White and Blue |
Bayswater Loop and Bayswater Junction (Used when required) |
Round |
Red |
Bayswater Junction and Guildford (Used when required) |
Round |
Chocolate |
Perth and Guildford |
Round |
Yellow |
Guildford and Midland Junction |
Round |
Salmon |
Midland Junction and Smith's Mill |
Round |
Lemon |
Smith's Mill and Chidlow's Well |
Round |
Black |
Chidlow's Well and Clackline |
Round |
Black and Yellow |
Clackline and Spencer's Brook |
Round |
Green and Yellow |
Clackline and Newcastle |
Round |
Caledonian Grey |
Spencer's Brrok and Northam |
Round |
Light Orange |
Spencers' Brook and York |
Round |
Black and Red |
York and Beverley |
Round |
Green |
Source: Pages 11 & 12, Appendix to Working Time Book No. 1 - September, 1892 |
||
1896 - Train Staff and Ticket Sections and the Staff Shape and Colours in use |
||
Fremantle - North Fremantle |
Round |
Pea Green |
North Fremantle - Cottesloe |
Round |
Green |
Cottesloe - Claremont |
Oblong |
Cerise |
Claremont - Subiaco |
Round |
Dark Blue |
Subiaco - Perth |
Shamrock |
Yellow |
Perth - 15 Mile |
Round |
White, Blue Stripe |
15 Mile - Bayswater Junction |
Round |
Orange |
Bayswater Junction - Racecourse |
Green and Brown |
|
Bayswater - Guildford |
Round |
Blue and Red |
Perth - Guildford |
Round |
Salmon |
Guildford - Midland Junction |
Round |
Salmon |
Midland Junction - Smith's Mill |
Round |
Lemon |
Smith's Mill - Lion Mill |
Triangular |
White and Black |
Lion Mill - Chidlow's Well |
Pear |
Pea Green |
Lion Mill - Chidlow's Well (deviation) |
Round |
Red |
Chidlow's Well - 51 Mile |
Round |
Pink |
51 Mile - Clackline |
Round |
Yellow and Black |
Clackline - Spencer's Brook |
Round |
Green and Yellow |
Spencer's Brook - York |
Round |
Black and Red |
York - Beverley |
Green |
|
Spencer's Brook - Burlong |
Round |
White and Black |
East Northam - Meckering |
Cross |
White and Black |
Meckering - Cunderdin |
Round |
Green |
Cunderdin - Kellerberrin |
Triangular |
Red |
Kellerberrin - Hine's Hill |
Triangular |
Yellow |
Hine's Hill - Merredin |
Round |
Pink |
Merredin - Burracoppin |
Round |
White |
Burracoppin - Parker's Road |
X Shape |
White and Yellow |
Parker's Road - Southern Cross |
Round |
Green |
Perth - Cannington |
Square |
Blue |
Cannington to Jarrahdale Junction |
Round |
Salmon |
Jarrahdale Junction - Pinjarrah |
Round |
Blue |
Boyanup - Donnybrook |
Octagonal |
Light Blue |
Busselton - Boyanup |
Cottage Loaf Bread |
Yellow |
Geraldton - Mullewa Junction |
Triangular |
Green |
Mullewa Junction - Walkaway |
Octagonal |
Red |
Geraldton - Northampton |
Round |
Blue |
Mullewa Junction - Mullewa |
Square |
Yellow |
Source: Appendix to Working Time Book No. 2. 15th April, 1896 |
||