
Lord Street (2)
LORD STREET (2) | |
WAGR - Eastern Railway (E. R.) | |
Mileage: ? | |
Next Down Station: | Next Up Station: |
Quick Facts | |
Opened | Closed |
1919 | 03/04/1960 |
Mechanical | Electrical |
22 Levers | Sykes L & B and Dowson's Block |
Fate: Unknown | |
Lord Street level crossing was for many years one of the busiest road / rail crossings in the Perth Metropolitan area. There had been a cabin at this place since 1898, however the subject of this page is the second of the Lord Street cabins - the 1919 to 1963 structure.
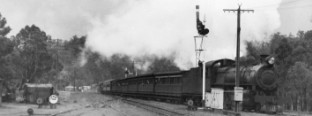
The photos above show the view along the fenced off lines between the Moore Street level crossing and Lord Street to the East - effectively 'sandwiched' by the Millars Saw Mills. Note the line into the Saw Mill on the right and the soot-blackened doll of East Perth's No. 7 Down Distant - S. W. Main Line. Other signals on this bracket are East Perth's No. 1 Down Distant - Main Line and (top arm) Lord Street's No. 15 Down Home - Main Line. These last two signals, as with all Home above Distant signal combinations mounted on the same signal mast, were worked by the 'slotting arrangement.' This prevented the Distant signal from being placed to "Proceed" when the more restrictive Home signal was at "Stop".
The Lord Street cabin was situated on the Eastern Railway between the busy junction of the Eastern Railway and the South Western Railway at East Perth (later named Claisebrook) and Perth Box 'C'.
During its history, Lord Street box worked on the western side with Moore Street; Pier Street (formerly Mackie Street); and Perth Box 'C' and on the eastern side with East Perth (later named Claisebrook).
Operating systems on the three lines were:
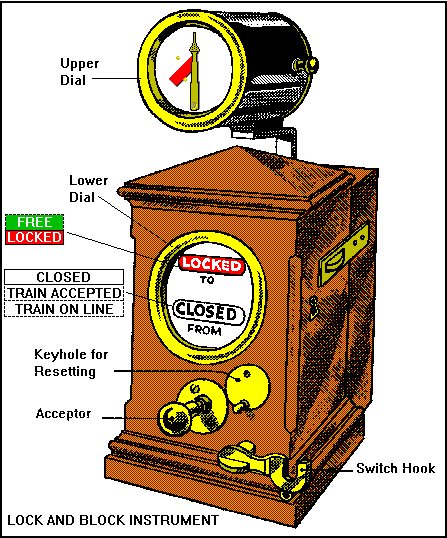
Up and Down Main Lines - Sykes Lock and Block;
Engine Road - Dowson's Three Position Block - modified version for use on single line sections (until superseded in 1955 by single line colour light signalling in 1955).
The 1922 General Appendix cites the following:
Single Line "Three Position" block instruments are in use between Box "C," Perth, and East Perth on the Engine Road. "Line Clear" must be obtained before the line outside the Home Signal is occupied, except when it is necessary to shunt outside the Home Signal at Box "C and East Perth, and Lord Street is switched in, in which case the line may be occupied after the Blocking Back signal 3-3 had been sent and acknowledged, and the block indicators placed to the "On Line" position.
These instruments are similar to those worked on double road, only have been designed to render them applicable to Single Road only. The acceptance of an "Up" train prevents a "Down" train being accepted until both sections are clear, and vice versa; but trains following in same direction can be accepted provided the previous train has cleared the first section.
Given the different methods of train working in use prior to 1955 and the necessity to operate the Gate Wheel for each and every train movement one can appreciate just how busy the Signalmen must have been at Lord Street - particularly so in 'peak' hours! Shirley Meakins, the daughter of the late Alfred Riseley (former Tunnel Junction Signalman) recalls: "When the Tunnel Junction Box closed, my father worked as a Relief Porter at various boxes and cabins between Perth and Chidlows. He absolutely hated working Lord Street gate box!"
The atmospheric photo of W. A. G. R. Pr Class locomotive No. 138 "Ashburton" passing Lord Street No. 2 Up Home - Engine Road was taken by the late Jack Stanbridge from the Brown Street footbridge between East Perth and Lord Street prior to colour light signalling days. Lord Street No. 6 Up Home - Up Main Line shares the gantry. The level crossing is visible to the right. Note the long (approx) 5' 6" signal arms!
The 1955 diagram of Signalling for Lord Street was issued in a special bound book of local instructions that heralded the introduction of the colour light signalling along the Engine Road which from 10/12/1955 became known as the Independent Main. At the time of this diagram however, Sykes Lock and Block was still in use along both Up and Down Main Lines. The gantry signals at both Perth 'C' and East Perth were quite a sight in reality!
Even after the abolition of the Lord Street cabin on 3/4/1960 and the subsequent introduction of half-boom gates and flashing lights at the crossing on 11/4/1960 the crossing still represented a major road traffic 'bottleneck' for many years, especially so in peak commuting hours. This situation was finally resolved in post electrification days by the construction of an road overpass and the partial lowering of the line between the new stopping place of McIver and Claisebrook during 1999. Now, nothing remains of the old Lord Street signal cabin or indeed the characteristic Saw Mills in the surrounding area. All has been swept away - replaced by car parks and contemporary commercial premises.
Information researched and interpreted by Chris. J. E. French of SignallingWA
Photographs © by Chris. J. E. French; Mr. Jack Stanbridge; Mr. Hood (W. A. G. R.) and The Pendon Museum UK via the Rail Weritage WA Archives
Diagram of Signalling by W. A. G. R.
Buy this page or View your SignallingWA Shopping Cart
This page is copyright, and permission must be sought from SignallingWA before this page is used for any purpose other than personal education.
LORD STREET (2) Employees | ||
This list may not be complete and does not yet include employees who worked here without being appointed. Where an appointment date is unknown, the Weekly Notice (WN) date advising of the appointment or other official documentation, i.e. Certificate of Competency (CC) will be used. | ||
Name | Appointed | Position |
| Beedeison, Phillip Joseph | 29/05/1921 - CC2367 | Junior Worker |
| Bealing, Claude Cecil | 01/01/1940 - Employee Ledger | Signalman, Class 2 |
Is a name missing? Please submit any corrections / additions with suitable evidence using the e-mail form above. | ||